|
|
Post by towhook on Dec 12, 2019 11:23:39 GMT -5
Hello, i'm Brian from western pa. I have a 62" 3b that I've have about 15 years. I'm finally get close to get it going. i'm in the middle of doing a carb restore. This is my first carb, and it's going not going great I broke a screw off the choke butter fly rod trying to clean it the other day, hope to have a carb top sourced locally. Other then that it's clean, I replaced what I had too. Very disappointed in the carb kit I got, that seems to be a common issue I have read. I'm going to do some reading here on the site. looks like I have to re do the dual diaphragm fuel pump as well, have been sitting for way to long  I hope that's not too bad of a job. How important is it to have a float measuring device ? and should the carb have a rubber tipped needle ? Given that it has a brass seat, i'd say that it should. I hope that's not too bad of a job. How important is it to have a float measuring device ? and should the carb have a rubber tipped needle ? Given that it has a brass seat, i'd say that it should.
Thanks brian |
|
|
|
Post by Scoutpilot on Dec 12, 2019 11:58:09 GMT -5
What model carb is on your F-head? The original needle and seat set was all metal. Pete DeBella sells a correct kit. The float setting is critical. With the metal tip, the setting is 5/16", without the gasket in place. The rubber tip needs a 9/32" setting. You can use the shank of an unused new drill bit for the measurement. Kits for your fuel pump are available from Then and Now. Just be ready with a complete description and number. You will need to disassemble the diaphragms to determine whether they are a rectangular hole and/or cross-type. Let me know when you are ready for that as some critical instruction is warranted.
|
|
|
|
Post by towhook on Dec 16, 2019 14:04:28 GMT -5
What model carb is on your F-head? The original needle and seat set was all metal. Pete DeBella sells a correct kit. The float setting is critical. With the metal tip, the setting is 5/16", without the gasket in place. The rubber tip needs a 9/32" setting. You can use the shank of an unused new drill bit for the measurement. Kits for your fuel pump are available from Then and Now. Just be ready with a complete description and number. You will need to disassemble the diaphragms to determine whether they are a rectangular hole and/or cross-type. Let me know when you are ready for that as some critical instruction is warranted.
the numbers that I got, or the important ones any ways. are carter yf a27-938sd. from what little reading I did on the 3b page that 938 sd seems to be the best of the line, and the lastest carb that the 3b's had on them. as for the needle and seat. I have all metal needle in the kit that I have gotten. so that can be swaped as I haven't put the carb back together yet. I broke off a screw on the choke butter fly, and the local guy who usta have a ton of these type items is busy guy who has lost the need to sell these parts for cash. So i'm going to need to probly find a carb top else were when you say the rubber needle needs a 9/32 setting were is that measurement from ? I assume when the float is totally closed ? so take the measurement as it would be upside down ? the carb is pretty much redone, with the kit from Kaiser willys that I got. I replaced the diaphragm and the springs, and the black stop on the metering arm. what type sealant should I use with the paper gasket that came in the kit ? seems odd that it's paper vs what was there when I took it apart. thx for the help.
As for the fuel pump, it's a double diaphragm, and no numbers on it other then a tag with # 4032 . is that number helpful / meaning full ?
|
|
|
|
Post by Scoutpilot on Dec 16, 2019 15:28:20 GMT -5
Okay. You have a Carter YF-938SD. It is the best, and last of the pre-emissions line, and the lastest carb that the 3b's had on them. The metal needle and seat should be spring-loaded. I all of the parts necessary to repair the choke shaft/butterfly. All float adjustments are made while the top is inverted and no gasket in place. The soft-tip needle needs a 9/32 setting measured at the tip of the float. Yes, take the measurement when it is upside down. Please do not use any sealant with the paper gasket that came in the kit? The first thing to do is ensure that all of the cutouts in the gasket line up as close as possible to right on.
# 4032 is the pump model number. If you intend to rebuild it, you'll need to disassemble it to verify the diaphragm shaft end configuration and whether the fuel side valves are pressed in or held by brackets.
|
|
|
|
Post by towhook on Dec 17, 2019 10:53:05 GMT -5
Okay. You have a Carter YF-938SD. It is the best, and last of the pre-emissions line, and the lastest carb that the 3b's had on them. The metal needle and seat should be spring-loaded. I all of the parts necessary to repair the choke shaft/butterfly. All float adjustments are made while the top is inverted and no gasket in place. The soft-tip needle needs a 9/32 setting measured at the tip of the float. Yes, take the measurement when it is upside down. Please do not use any sealant with the paper gasket that came in the kit? The first thing to do is ensure that all of the cutouts in the gasket line up as close as possible to right on.
# 4032 is the pump model number. If you intend to rebuild it, you'll need to disassemble it to verify the diaphragm shaft end configuration and whether the fuel side valves are pressed in or held by brackets. great news, thanks for the confirmation. in my jeep rebuilding book I didn' t see any pics or words with the metal tip and springs. that makes me wonder if the kit has them, or I f I could even I identify them loose in the bag ? me send you a p/m for those items that you have to fix my new to carb issues. thx. and i'll go out any find a bit and do the measuring to day. as for the pump i'll do the same.
is this run down a good guide for the fuel pump ? www.picturetrail.com/sfx/album/view/22881705
thx for the help
|
|
|
|
Post by towhook on Dec 17, 2019 11:22:03 GMT -5
well the float sits low, or hi. depends on wither it's upside down lol the carb float at the tip ( away from the pivot ) is 13/32 from the base, the seat appears to be fully down I did try and tighten it. so now what ?
thx brian
|
|
|
|
Post by Scoutpilot on Dec 17, 2019 11:57:28 GMT -5
If you have a correct float there should be a tang (between the two arms) that contacts the needle. This tang can be bent to change the setting. Beyond that, the arms are soldered to the float. That joint can be gently bent, but only slightly, to adjust the float setting.
|
|
|
|
Post by towhook on Dec 18, 2019 10:37:32 GMT -5
If you have a correct float there should be a tang (between the two arms) that contacts the needle. This tang can be bent to change the setting. Beyond that, the arms are soldered to the float. That joint can be gently bent, but only slightly, to adjust the float setting. ok, how do I know if I have the right seat? if I don't have the right needle. the seat that I have would be like a deep well socket vs the short socket of the seat that came with the metal needle in the kit. any thoughts. i'd like to try and verify as mush as I can before I bent the float.
thanks
|
|
|
|
Post by Scoutpilot on Dec 18, 2019 10:43:46 GMT -5
Can you post a picture?
|
|
|
|
Post by towhook on Dec 18, 2019 11:33:30 GMT -5
I could ? my old photo share place ended my acct. cause I shared the pics on other forums so can you post one here with out that ? if so I can take pic with the camera and up load it.
brian |
|
|
|
Post by Scoutpilot on Dec 18, 2019 11:55:04 GMT -5
Just download the photo to your desktop and "Add image to post"
|
|
|
|
Post by towhook on Dec 19, 2019 11:25:59 GMT -5
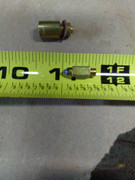 this is the org needle and seat 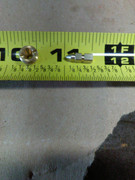 new needle and seat that came with rebuild kit |
|
|
|
Post by towhook on Dec 19, 2019 11:28:03 GMT -5
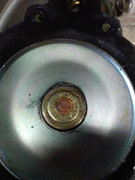 fuel pump diaphragm holder 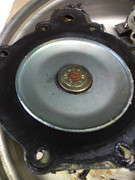 |
|
|
|
Post by Scoutpilot on Dec 19, 2019 12:13:43 GMT -5
Picture #2 shows the Metering Rod Jet and the new check weight for the accelerator circuit. I need to see the other ends of the diaphragm stems.
|
|
|
|
Post by towhook on Dec 20, 2019 10:05:35 GMT -5
Picture #2 shows the Metering Rod Jet and the new check weight for the accelerator circuit. I need to see the other ends of the diaphragm stems. so in picture #2 that's not a needle and seat ? when you say the ends of the stems, that would be under the diaphragm ? any tips as to how to take off the diaphragm it's self ? do I twist them off/ un screw them or use a dremel to cut them ?
thanks again
|
|


 I hope that's not too bad of a job. How important is it to have a float measuring device ? and should the carb have a rubber tipped needle ? Given that it has a brass seat, i'd say that it should.
