|
|
Post by Scoutpilot on Aug 8, 2015 5:51:20 GMT -5
I'm no expert when it comes to adding photos or converting PDFs.Click the link to view the .pdf file detailing the steps in the W-O Carburetor Service Procedure. This is a fast, simple, Circuit method of servicing W-O Carburetors. BE ACCURATE.
Parts list and exploded parts diagram. Click on the image for a better view.
|
|
|
|
Post by Scoutpilot on Dec 24, 2015 6:06:16 GMT -5
All right. I’m noticing a growing trend toward DIY. I applaud this trend. Being self-sufficient is important, but let’s do it right, shall we? In the last few days I’ve come a cross a couple of posts on other sites asking about proper procedure for repairing a worn, vacuum leaking throttle. Use your Vacuum Gauge to keep tabs on the performance of your carb and motor.
First, let’s go over a couple of things.
1. Your Throttle shaft, when new, mic’s out at .3125”.
2. The bores in the throttle are, at new, .3125”.
3.(.005”) is the max allowable gap and will give you a vacuum leak. Not much, but it is the beginning of the problem. The wear pattern in the throttle bores will be offset. Normally, this wear will be more exaggerated at the outer rims of the bores. The wear pattern on the shaft and in the bores will not be symmetrical. Due to the horizontal forces acting upon the shaft and bores through the throttle linkage the wear pattern will be of an egg shape. Hopefully the wear is not too severe. Finding the center of a single egg shaped hole is difficult at best. The “narrow” end of the wear will be where the pressure exerted on the shaft, by the linkage, was greatest. The rearward side of shaft entry bore will be worn and the forward side of the exit bore will be worn. Simply drilling through both bores is not to be recommended as it will necessitate either the oversize shaft or longer bushings as the gap created around the standard (.3125”) size shaft on the inside of the throttle will cause idle/vacuum issues.
The most commonly given answer to this situation is to “drill all the way through” and install either an oversize throttle shaft or bushings and replace the standard (.3125”) shaft.
Well, when you do the first part of this suggestion you create a situation where only one fix is possible, the oversize shaft. I am aware of only one vendor, on eBay, selling oversize shafts, for the 539S only, right now. For the benefit of those who drive their Jeeps daily, this is the last time you can fix the throttle, should you choose this method.
Do not drill all the way through unless your new bushings will fit the full length of each bore from in to out. Let’s break that down.
1. Don’t use a drill bit. Drill bits weren’t designed for this task. The geometry of a hole drilled in metal by a twist drill may not be accurate enough (close enough to a true cylinder of a certain precise diameter) and may not have the required smooth surface finish for a proper alignment for the shaft. Although modern twist drills can perform excellently in many cases—usually producing sufficiently accurate holes for most applications — sometimes the stringency of the requirements for the hole’s geometry and finish necessitate two operations: a drilling to slightly undersize, followed by reaming with a reamer. I consider drilling and using an over-size shaft to be a field-expedient repair because you can only do this one time.
Do not attempt this process with a hand-held drill!
Drill presses weren’t designed for this either. Use instead a proper six-flute right-hand twist 3/8” HSS reamer in a milling machine at 512 RPM (+/-5 rpm). I use oil to keep the tool cool.
Set up involves placing a new piece of .3125” rod stock through both bores, chucking the whole thing up in the machine’s chuck, then lowering the throttle/shaft assembly into the tool-maker’s vise on the milling machine. Careful measurement of the gap surrounding the stock piece ensures that the reamer will proceed in the bores straight and true. I ream only to the depth that corresponds to the length of the bushing I will be installing. When this procedure is done I remove the throttle from the vise, clean it and install the bushing in that bore. I then, using a hand reamer, ream the bushing to .3125” from the opposite side of the throttle, being very careful to maintain center as I proceed through the bushing. I then check for proper shaft fit and double check the exit.
I then return the throttle/shaft working assembly to the milling machine and repeat the process.
2. Again, don’t ream all the way through. Only to the depth that corresponds with the length of the new bushings. Yes, I know. Going all the way through, it’s easier to maintain a straight-through bore. The hard lesson here is that unless the new bushings fit the entire length of the new bores there will be a gap around the circumference of the throttle shaft which will cause flow problems through the carb and you won’t have fixed a thing because you won’t be able to get the idle down. When you bore all the way through and then have the flat bushings pushed all the way in, they will protrude slightly into the throttle chamber. You will have to cleanly and completely remove these shoulders because the throttle plate won’t fit on the shaft with either shoulder protruding.
3. Do one side at a time. When the first new bore is completed, insert the new bushing. Oil it before it goes in. I use a 5/16 bolt and nut to push/pull it in. Check both bores for true with a piece of 5/16” straight round stock and move on to the other side.
Okay. Here is a link to what a machinist did for his WO Throttle base.
Pay attention to what you are doing through this procedure and you will succeed.
|
|
|
|
Post by Scoutpilot on Aug 15, 2016 7:25:32 GMT -5
The most important task in rebuilding your carburetor is the cleaning process. Simply spraying carb cleaner on it and down the throat won’t do the job. Ideally, the carb should be disassembled as far as possible without removing fixed nozzles. Check your kit to be sure you have ALL of the parts required to rebuild it completely. This includes the Welch plugs. Those little aluminum plugs which you need to remove and replace with new at re-assembly. Removing these plugs should be performed with care so as not to gouge the rim of the hole each is pressed into. Removing these plugs is necessary for a thorough and complete cleaning as the passages they close externally are part of the vacuum and fuel passages that need to be kept clean for proper operation of the carburetor.
The soaking process can be accomplished using a variety of different products. You can go (expensively) with the Non-Chlorinated cleaning chemicals which can only be found online. Just make sure you have elbow-length chemical-resistant gloves, an apron, and a respirator. These are very hazardous to humans but, when properly used, produce a superior and thoroughly clean. The over-the-counter Chlorinated formulas don’t do as well and if you are using a tank-type parts washer with a petroleum-based liquid to finish be aware that the Chlorinated formulas will eventually cause the pump to seize from varnish buildup.
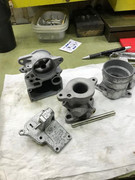
I have found an alternative to the high prices and the non-cleaning cleaners. After reading about it online, I decided to try it. Pine-Sol. Simple, inexpensive, effective. You can use it straight from the bottle or dilute it to a 50/50 with water. Let the parts soak overnight and rinse thoroughly with water. A powdery residue is left when they dry but is easily removed. Let me show some examples of before and after.BEFORE: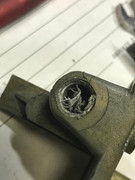 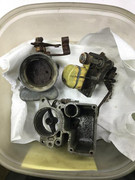 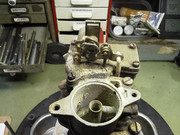   AFTER AFTER
 Attachments:
|
|
|
|
Post by jeffwho on Aug 15, 2016 12:16:21 GMT -5
There's "DIY" and then (at least in my case) "DI-Why did I try to do this myself!?" That's where certified experts like you come in, Scout and we're lucky you are so willing to share your knowledge and work with us jeep guys, for sure!
|
|
|
|
Post by Scoutpilot on Aug 15, 2016 12:20:04 GMT -5
Thank you. Knowledge needs to be shared, not hoarded.
|
|


